Published Oct 27, 2013
Had some old 2-axis mini joysticks laying around. They're not really breadboardable, a bit awkward to use, and their pins kept getting bent during my various relocations (they do have a packaging material, but they keep falling out.) Design files and renders after the jump.

Credit: CTS Electrocomponents
Published Oct 25, 2013
Got a Helios 44-2. Nice lens. Pretty old (serial number may imply it's from 1979), but in decent condition; $30 shipped. It had a lot of dust and marks on both the front and rear elements, but they were very easily cleaned with MagicFiber-brand microfiber cloth which, frankly, lives up to its name - the thing is magical. (I got mine from Amazon; cheaper knockoffs may scratch the glass, so I wanted a reputable source.)
But it has fungus after the front element.


How do I open it up to get at it?
Published Oct 25, 2013
There's absolutely no point buying a $300 (or $3000) piece of glass and putting a $10 filter on it if the filter degrades the image. Obviously, a more expensive, higher quality, professional filter is the way to go. This is doubly true for a UV filter (or a clear filter - normal digital camera already filter UV, so it's used just for protection), since a common alternative is to use a hood, which doesn't add any glass in front of your lens.
Putting a filter on a lens adds another air/glass interface (or two!). This can result in blur, loss of sharpness, color distortion or shift, flaring and ghosting, and so on. For these reasons, there are certain situations where even the best filter absolutely destroys and image. Furthermore, certain lenses have front elements very close to the threads, and some garbage no-name filters actually damage the lens permanently!
But I would like to use a filter for protection against scratches, and I wouldn't like to spend a whole lot of money doing it. So I bought a 58mm three-filter Fotodiox Kit (UV, CPL, Soft Diffuser) from amazon. I paid $12 for it. I put it on my Canon EF 100mm USM macro, on a crop sensor camera (T3), and tried to spot any differences in quality, assuming no bright light shining onto the filter (so no purposeful flare/ghosting). Pictures and evaluation after the jump.
Published Oct 17, 2013
Modern Linux distros provide POSIX Programmer’s Manual in manpages, sections , , and . You can check if it works on your machine:
0p
1p
3p
123 | man 0p stdio.h man 1p exit man 3p open |
You can consult the POSIX documentation while coding on a beach or in an airplane, without Internet connection. It is always on your fingertips.
Published Oct 17, 2013
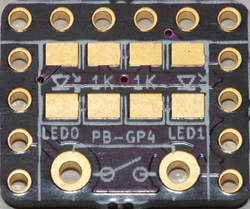
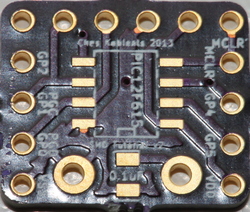
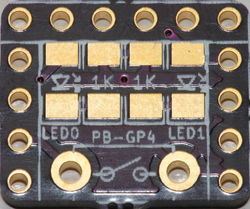
This is an update to my previous spin. I've fixed all of the issues! Version two has:
- PIC12F615 - 8 pin SOIC - or any other PIC with the same pinout
- Two 1k resistors - 1206
- Two LEDs - 1206
- Pushbutton, two pin - through hole
- Debounce capacitor - 0805
- Two 4-pin headers, one on each side, for the PIC breakout
- One 6-pin ICSP (in-circuit serial programmer) header for PIC programming
Here're the improvements I made, and some I'd like to make. In order of importance, improvements:
Published Oct 17, 2013
People seldom use the command on Linux machines nowadays. We are accustomed to an equivalent command ,
that for eons was slightly more convenient.
There is a reason, though, to use command much more often. Especially when we want to figure out something less routine and less obvious.
maninfo
manPublished Oct 14, 2013
So yeah, I got a free Arduino Intel Galileo on October 11, 2013. Isn't that a pretty box?
Full disclosure: I am an Intel employee as of this post (10/14/2013). The opinions expressed here are only my own, not that of my employer. I did not work on the Quark. I am using my personal pictures, publicly available sources of information, and a little bit of guesswork.
At Intel's Galileo documentation site, you can find schematics, reference designs, a bill of materials, release notes, shields, and so on.
Here's the unboxing.
Published Oct 13, 2013
OSH Park is a batch PCB service for 2- and 4-layer boards. They charge $5 / square inch, including shipping. They send you three copies of your board (or any other multiple of three). I don't know their minimum board sizes, but the smallest boards I've ordered were 60 cents. The turn-around time is about two weeks for me, with about two weeks for them to panelize, order, and receive the boards, and a day to ship (note: I currently live 20 minutes away from them, so this is probably more like 2.5 weeks normally). The quality is high enough, and the DRC rule limitations are acceptable, for hobbyist work. (Update 12/03/13: They seem to have reduced build time to 1 - 1.5 weeks!)
Published Oct 13, 2013
Seeedstudio Fusion is a batch PCB service for 2- and 4-layer boards. With shipping, the cheapest option is ten boards, 5x5 cm (2x2 inch) maximum size, for $15. The turn-around time is just about a month, which includes about a week to build and about three to ship. The quality is high enough, and the DRC rule limitations are acceptable, for hobbyist work.
Published Oct 13, 2013
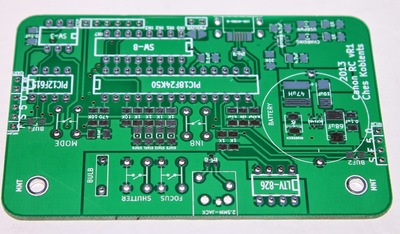
As mentioned in my previous article, a Canon remote control only needs a 2.5mm TRS audio jack, and only needs to short tip-to-sleeve to shoot and ring-to-sleeve to focus. I took this knowledge and built a simple circuit: A pushbutton to focus, a pushbutton to shoot, and a switch for bulb mode (the switch activates the shutter just like the shutter button, but you don't have to hold it yourself.) I've included an optional TVS diode, which you may feel free to ignore. Here's the circuit:
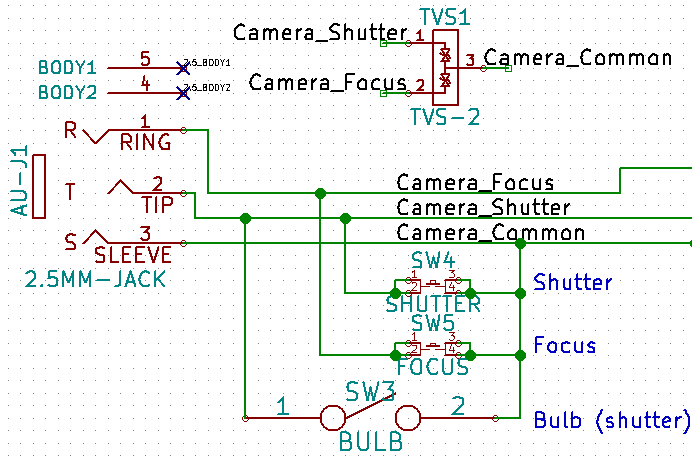
A transient voltage suppression diode protects against ESD, or tries to. I wasn't entirely sure what the proper specifications were on my remote control, so I picked one that looked reasonable. Feel free to ignore it.
But if I want a remote control, I want one that's automated, not one I always have to press myself. The manual function isn't going to disappear, but more fun stuff gets added. To give an advance summary, the board is going to get USB, serial, signalling I/O with buffers, a battery with a charger IC and a boost converter/regulator, a microcontroller, user input, user output, and even redundancy.
Published Oct 12, 2013
Linux Mint has a silly thing, where there is a banner across the top of the file browser when there are certain file types in the current directory. For example, the one that annoyed me most read "Media contains digital photos". Why does it feel the need to tell me? Here's how I got rid of it, thanks to this source.
Add these lines to ~/.local/share/applications/mimeapps.list:
Then update the mime database and restart caja (closes all your open file browsers)
[Removed Associations]
x-content/image-dcf=gthumb-import.desktop;
x-content/image-picturecd=gthumb-import.desktop;brasero.desktop;
Then update the mime database and restart caja (closes all your open file browsers)
12 | sudo update-mime-database /usr/share/mime pkill caja |
Published Oct 12, 2013
An alternate title: My Canon T3 programmable remote control is here!
Nice, eh? Costs $10 for 2x2" (5x5 cm) boards (ten count), $20 for 4x4" (10x10 cm) boards (five count). Add five dollars shipping, and a month between ordering and receiving them. Not bad on a budget. Link to the service.
Published Oct 12, 2013
Yes, it works! Even though it's not officially supported in Magic Lantern v2.3, it works. It's awesome. It's also free open source software.
Have you ever looked at your camera and said - why isn't this function here? I know the hardware exists on the camera, and I know it's electronically controlled, and I know other features control it, so why can't we have a feature to control it in the way I want?
Oh, I know why - because apparently, an intervalometer (firing the shutter every x seconds) is reserved for the expensive cameras. Our plebaian camera can certainly fire the shutter electronically, but we haven't paid enough for the camera to keep firing it.
And so on and so forth. I completely understand the argument for partitioning the market. Everyone does it for an excellent reason: low-end sales are the bulk of the market, but if you give the low end all the features, nobody will buy the high-end. It doesn't make sense to give the cheapest $500 camera all of the professional controls demanded by people paying $3000 for a camera body. There's also no point writing separate operating systems; rather, just write one, make all your cameras work with it, and simply strip out some software functionality in addition to the actually different hardware.
But where I sit with my camera I can actually afford, well, wouldn't it be nice if I could get all the electronic features? Cue Magic Lantern.
Published Oct 11, 2013
Osh Park had a one-week turnaround time for this order. (I wonder if that will keep happening? I can only hope.) Up soon: tutorials based on these boards!
Pictures taken with my shiny new macro lens! I may or may not have figured out how to use it properly. The boards are very purple, which isn't shown as well as it should be. Also, the macro lens shows enough details that you can see the silkscreen being very choppy - it's deposited in a rectangular way; this is completely normal, and just usually not seen without a microscope.
Published Oct 10, 2013
I was wondering what the minimum focus distance switch does. Here's what it looks like:


I thought it was a mechanical lock to prevent you from focusing closer, but had no idea why. When I got to play with a lens that had this switch, I could still focus to minimum distance manually! Then I tried using AF and figured out what it's for:
The switch tells the camera auto-focus not to focus closer than what is selected. Helps the focusing algorithm work faster by eliminating some guesswork. That's it!
Published Oct 9, 2013
This week in design: AC signals are so much cleaner with PCBs than on a breadboard! Here are some boards I ordered from Osh Park for 60 cents per three boards. (Don't worry, I batched my order into a bigger one to make sure Osh Park didn't lose money on shipping.) The PCBs are still bread-boardable, so there are no downsides (except the wait time).
Unipolar rectifier for a square wave


Bandpass filter, RC


Published Oct 3, 2013
This should work for all the Rebel series. I only have the T3/1100D.
The good news is that remote control is drastically simpler than you would expect. The camera takes a 2.5mm audio jack. The tip of the jack is the release shutter, the middle band is the autofocus, and the base band (the sleeve; the band closest to the jack body) is common.
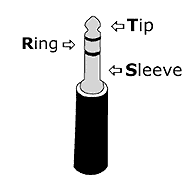

The two functions are activated when they're shorted to common.
I will want to control the camera in several ways:
- Pushbuttons to focus and release shutter
- A microcontroller with programmable modes
- External sources
Published Oct 3, 2013
Update 3/28/18: This appears to be fixed in the newer KiCAD libraries, and probably has been for some time.
KiCAD's default collection of libraries has an issue in the connect footprint library, including the set of SIL footprints. (The SIL footprints are usually used for things like headers). In short, many manufacturers recommend 1mm diameter holes. KiCAD uses holes just slightly bigger than 0.8mm. This is not an academic issue - it caused problems for me! A manufacturer-recommended footprint looks like this:


Published Oct 3, 2013
An update to my previous post: Boards are ordered (from Osh Park).
SMD soldering tutorial v2 (PIC12F615)


PIC USB test harness v1 (PIC16F1455)


